How to cut a mat for a photo frame
Our Powder room turned full bath REMODEL got featured over at IKEAhackers.net today. Check it out.
---
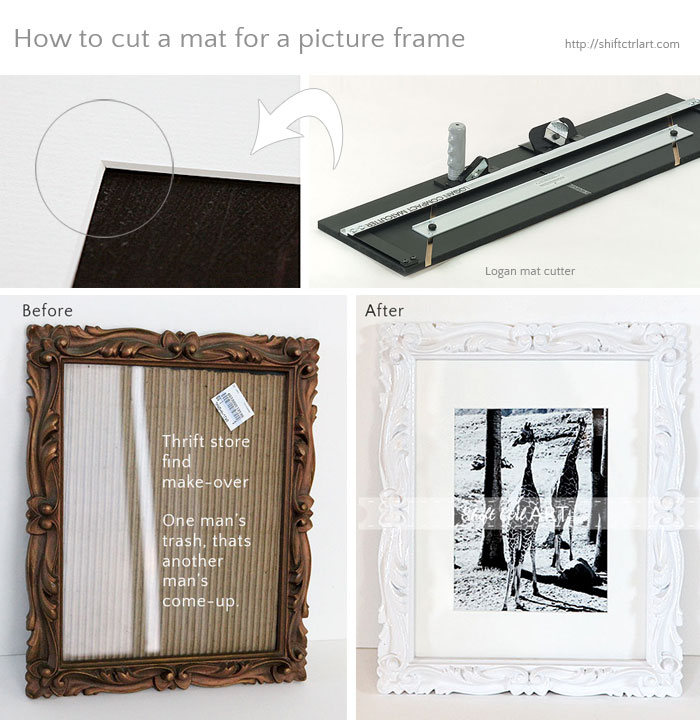
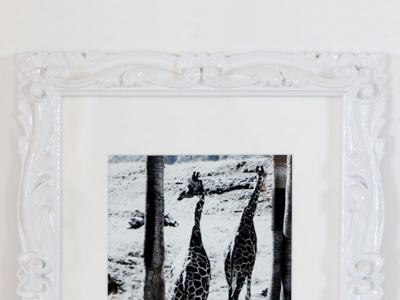
Last week I showed you my framed giraffe photo in a frame I had bought at a thrift store for $1.59 in the Young House Love Macklemore thrift shop challenge. Today I want to show you how I cut a custom mat board for the frame.
Last year I got a Logan 301-s cutter and took a class at my local college to learn how to use it. A one day class. We learned how to cut framing mats, how to properly assemble a frame and a few tips and techniques that were pretty nifty. (I am so bringing back the word nifty).
Putting a frame together from scratch, is not really that cost effective, so I am not going to pursue that. I do love being able to cut my own mats though. I love that I can make custom openings and it is so, so much cheaper than getting a mat cut at the store or even buying their ready mats in the standard sizes. I would say it is between a fifth and a tenth of the price for a mat if you cut it yourself.
Now, I am all for getting the top of the line equipment, but it is not really necessary unless you plan on opening a framing shop and the more expensive the cutters get, the bigger they get, so that factored in to my decision as to which one to get as well.
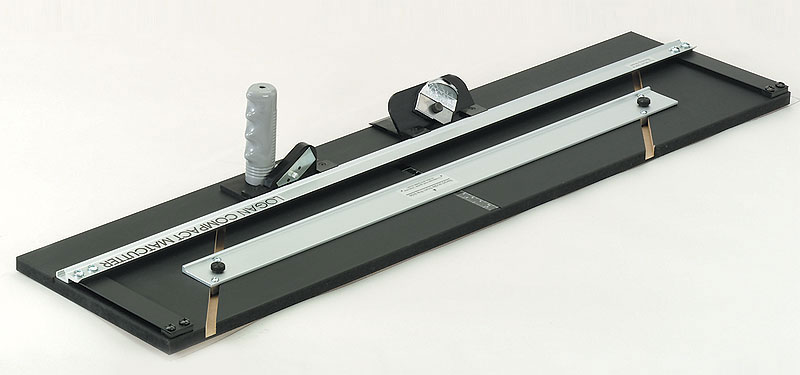
Image via Logan Graphics
I went with one that is almost towards the bottom of the list price wise and got the Logan 301-s cutter. I also got 100 extra blades while I was at it, as you tend to go through the blades pretty fast to get great results every time.
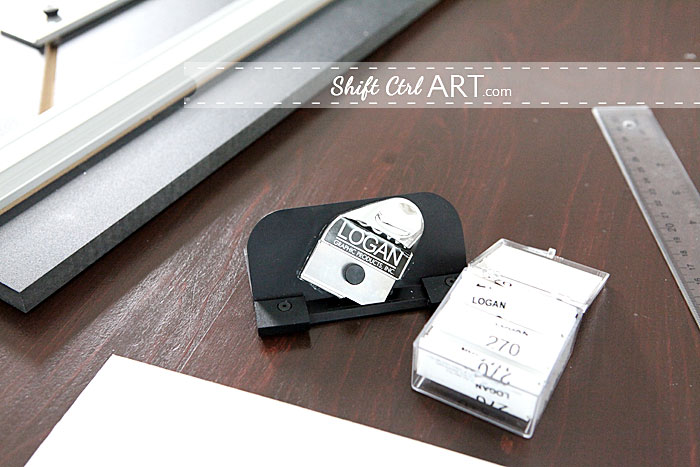
Here you see the holder for the blade - it comes with the cutter - the black one that says "Logan" on it.
The blade is screwed on to a spring mechanism so you can push down on the blade while cutting, but it will spring back when you release it.
To cut a mat, first cut the size of the mat to the size of your frame. My frame from the Thrift store challenge was 8x10 inches and I had already cut up a big 32x40 inch mat board which is the standard size. I got mine at Aaron Brothers. Now, this cutter only accepts mats up to 29 inches, which is a little strange considering the standard size is 32, so I had to first cut my mat board in half with a Stanley knife, but I think the next time I need to buy a mat board, I will just have Aaron Brother's cut it in half for me as they have bigger machines. I can't imagine that they would charge for that.
Next, figure out the opening of the mat board.
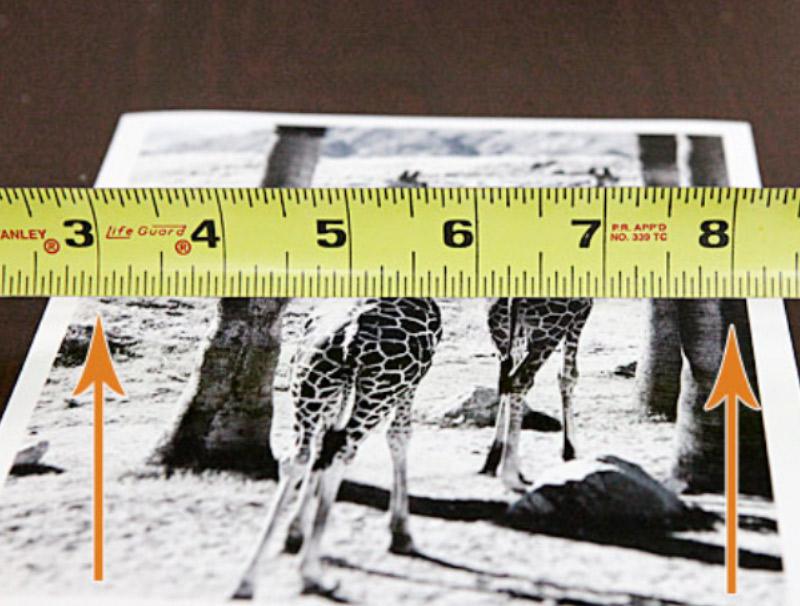
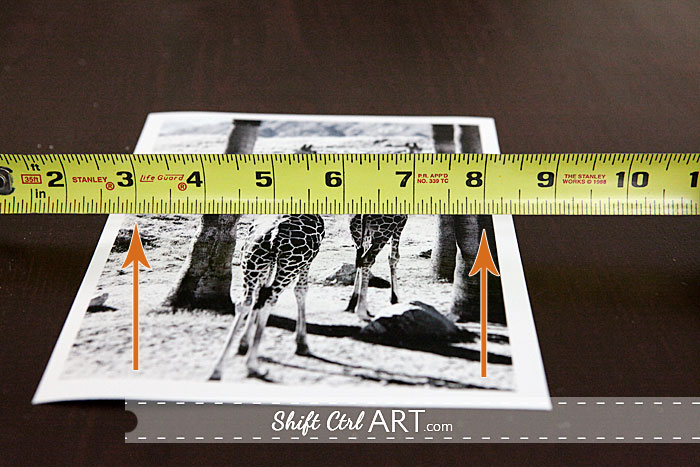
Take a tape measure and start out at the width of your mat board. Mine was 8x10 and here I am measuring for the width, so my measurement start off point is 8 - the right orange arrow. Set down the 8 inch mark of the tape measure on the photo where you want the mat to go, overlapping the image a bit so you don't get a white line.
Then look over at the other side - the left orange arrow and choose a mark that is also overlaying the image a bit where you want the other side of the opening. I chose the 3 inch mark. You have now figured out that the sides of the matting should be 3", but since you want the image to go in the middle of that divide by 2 to get 1.5".
Then do the height the same way like this.
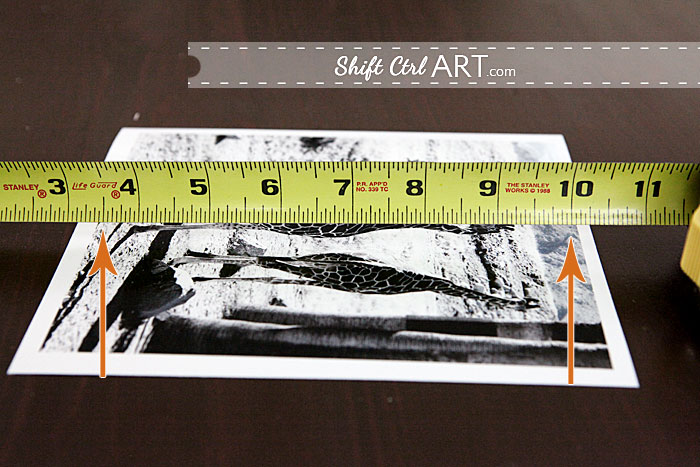
The height of the mat was 10 inches, so going by the right arrow, I set down the 10 inch mark onto my image and then looked at over at the left orange arrow and chose the 3.5 inch mark. Again I wanted the image in the middle, but you can position it anywhere and then adjust your measurements accordingly. I just divided by 2 to get 1.75 inches.
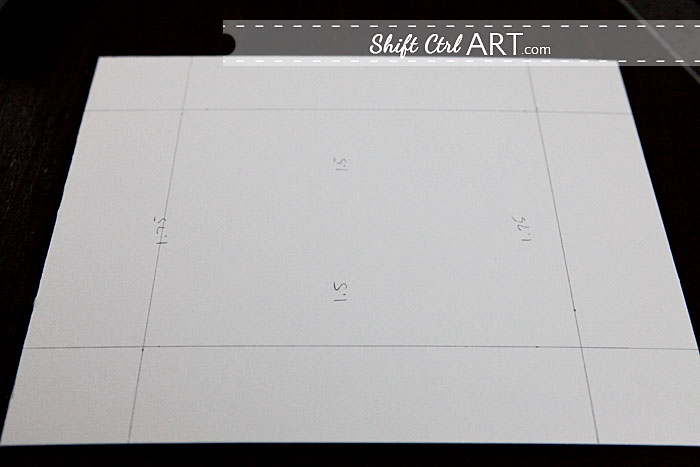
Then, turn your mat board over and using pencil and your measurements make lines on the back like that. Make sure that the lines go all the way to the edges or at least cross the other lines. It's the cross hairs you are interested in more than the lines themselves.
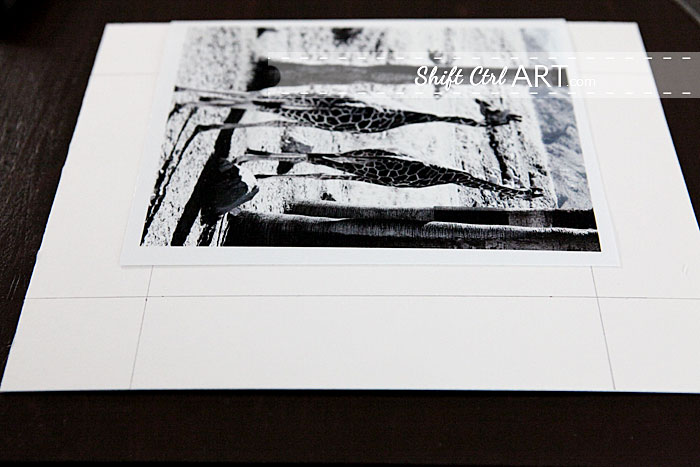
Next. adhere to the measure twice, cut once principle and check with that the lines are indeed on the inside of the print so it doesn't plonk through after you are done cutting. Could happen Mine is overlaying quite a bit and if I did not have to illustrate it for the blog, I might have drawn new lines and made the opening a tiny bit wider, but that would have looked all confusing, so I just kept it like that.
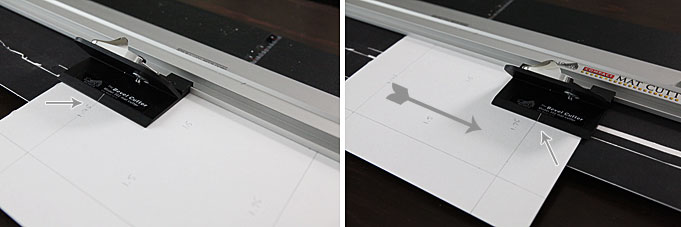
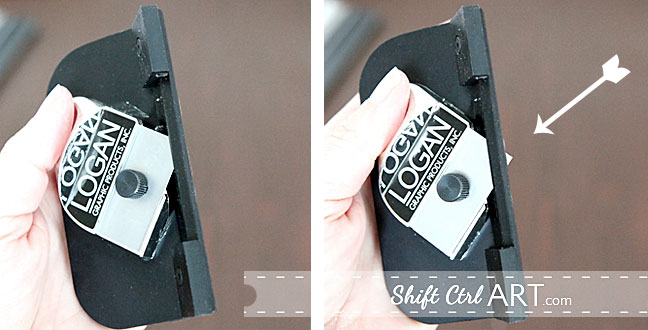
Next, you insert the mat into the cutter and tighten the sliders in the back so the pencil line you drew before lines up with the rail that the cutter is on. On the left image you see that I put the black blade cutter onto the rail and it has a white line on it where the arrow is pointing. Line that white line up with your pencil line that is perpendicular to the line you are going to cut. Then press down on the blade and slide the cutter until the white line is over by the other perpendicular line like the right hand picture is showing.
Repeat for the other three sides. The center is going to plop out, but if it's stuck in one of the corners, no big deal, just take another blade and run it along the cut edge so it is at the right angle and cut the tiny paper thread that is still hanging on to release the board. Don't tear it off or you will not get a good result.
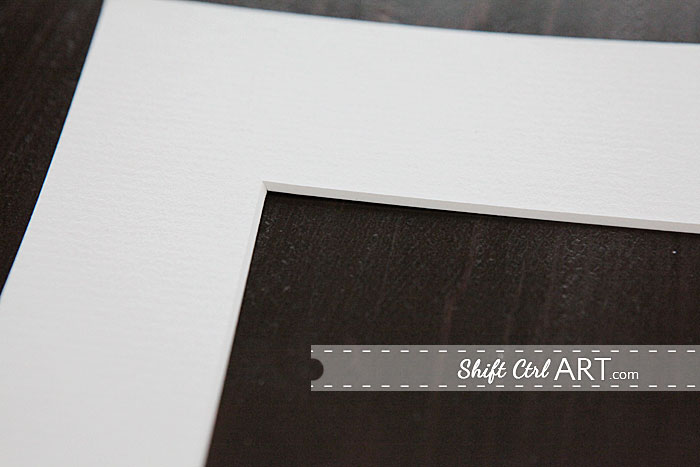
This method gives you those nice 45 degree angled cut frame mats.
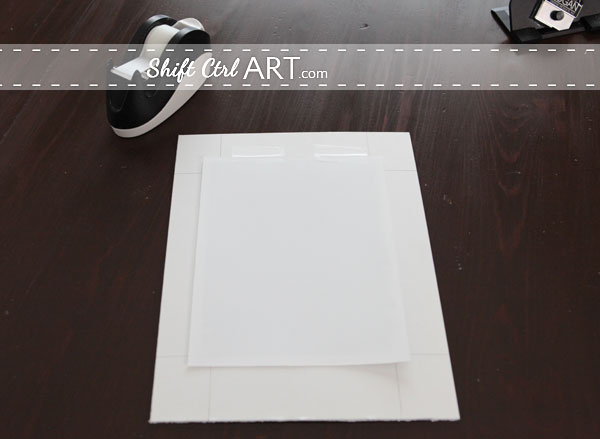
Next, I used tape at the top of the image and here is another tip: Only tape it at the top. That way you don't get bulges in the image or artwork should the paper contract differently over time than the mat. Tape is already acid free so you can just use regular tape without getting yellowing of the image.
Then mount the new mat and image in the frame.
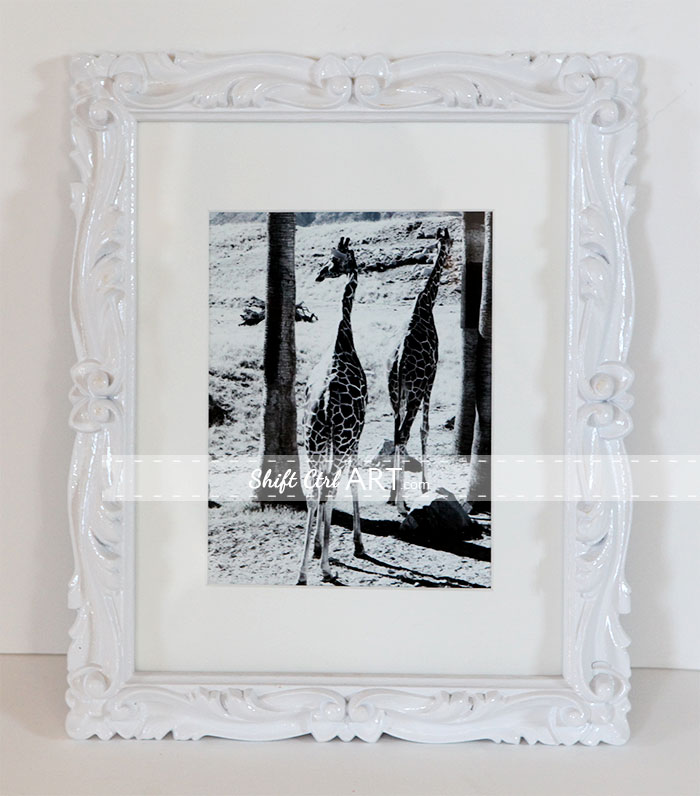
That's how to cut a mat for a picture frame.
Click here to go to the original frame post and see where I hung the picture.
Do you ever cut your own mats? Do you frame your photos or art work? Are you a Maclemore fan? Let me know in the comments.
Share
---
Last week I showed you my framed giraffe photo in a frame I had bought at a thrift store for $1.59 in the Young House Love Macklemore thrift shop challenge. Today I want to show you how I cut a custom mat board for the frame.
Last year I got a Logan 301-s cutter and took a class at my local college to learn how to use it. A one day class. We learned how to cut framing mats, how to properly assemble a frame and a few tips and techniques that were pretty nifty. (I am so bringing back the word nifty).
Putting a frame together from scratch, is not really that cost effective, so I am not going to pursue that. I do love being able to cut my own mats though. I love that I can make custom openings and it is so, so much cheaper than getting a mat cut at the store or even buying their ready mats in the standard sizes. I would say it is between a fifth and a tenth of the price for a mat if you cut it yourself.
Now, I am all for getting the top of the line equipment, but it is not really necessary unless you plan on opening a framing shop and the more expensive the cutters get, the bigger they get, so that factored in to my decision as to which one to get as well.
Image via Logan Graphics
I went with one that is almost towards the bottom of the list price wise and got the Logan 301-s cutter. I also got 100 extra blades while I was at it, as you tend to go through the blades pretty fast to get great results every time.
Here you see the holder for the blade - it comes with the cutter - the black one that says "Logan" on it.
The blade is screwed on to a spring mechanism so you can push down on the blade while cutting, but it will spring back when you release it.
To cut a mat, first cut the size of the mat to the size of your frame. My frame from the Thrift store challenge was 8x10 inches and I had already cut up a big 32x40 inch mat board which is the standard size. I got mine at Aaron Brothers. Now, this cutter only accepts mats up to 29 inches, which is a little strange considering the standard size is 32, so I had to first cut my mat board in half with a Stanley knife, but I think the next time I need to buy a mat board, I will just have Aaron Brother's cut it in half for me as they have bigger machines. I can't imagine that they would charge for that.
Next, figure out the opening of the mat board.
Take a tape measure and start out at the width of your mat board. Mine was 8x10 and here I am measuring for the width, so my measurement start off point is 8 - the right orange arrow. Set down the 8 inch mark of the tape measure on the photo where you want the mat to go, overlapping the image a bit so you don't get a white line.
Then look over at the other side - the left orange arrow and choose a mark that is also overlaying the image a bit where you want the other side of the opening. I chose the 3 inch mark. You have now figured out that the sides of the matting should be 3", but since you want the image to go in the middle of that divide by 2 to get 1.5".
Then do the height the same way like this.
The height of the mat was 10 inches, so going by the right arrow, I set down the 10 inch mark onto my image and then looked at over at the left orange arrow and chose the 3.5 inch mark. Again I wanted the image in the middle, but you can position it anywhere and then adjust your measurements accordingly. I just divided by 2 to get 1.75 inches.
Then, turn your mat board over and using pencil and your measurements make lines on the back like that. Make sure that the lines go all the way to the edges or at least cross the other lines. It's the cross hairs you are interested in more than the lines themselves.
Next. adhere to the measure twice, cut once principle and check with that the lines are indeed on the inside of the print so it doesn't plonk through after you are done cutting. Could happen
Mine is overlaying quite a bit and if I did not have to illustrate it for the blog, I might have drawn new lines and made the opening a tiny bit wider, but that would have looked all confusing, so I just kept it like that.Next, you insert the mat into the cutter and tighten the sliders in the back so the pencil line you drew before lines up with the rail that the cutter is on. On the left image you see that I put the black blade cutter onto the rail and it has a white line on it where the arrow is pointing. Line that white line up with your pencil line that is perpendicular to the line you are going to cut. Then press down on the blade and slide the cutter until the white line is over by the other perpendicular line like the right hand picture is showing.
Repeat for the other three sides. The center is going to plop out, but if it's stuck in one of the corners, no big deal, just take another blade and run it along the cut edge so it is at the right angle and cut the tiny paper thread that is still hanging on to release the board. Don't tear it off or you will not get a good result.
This method gives you those nice 45 degree angled cut frame mats.
Next, I used tape at the top of the image and here is another tip: Only tape it at the top. That way you don't get bulges in the image or artwork should the paper contract differently over time than the mat. Tape is already acid free so you can just use regular tape without getting yellowing of the image.
Then mount the new mat and image in the frame.
That's how to cut a mat for a picture frame.
Click here to go to the original frame post and see where I hung the picture.
Do you ever cut your own mats? Do you frame your photos or art work? Are you a Maclemore fan? Let me know in the comments.

About Katja Kromann
I am a Danish American decorating life in Seattle. I love all things design and DIY.
I can’t think of anything more fun than coming up with project, making it, photographing it and sharing it with you on my websites.
Since 2018 I have been making Ceramics, nearly full time.
AHomeForCeramics.com AHomeForDesign.com AHomeForCrafts.com AHomeForFood.com My Portfolio