Halloween no-sew costume: Shulk from Xenoblade
This was one of the years were the Halloween costume took on epic proportions. Maybe mostly in my mind.
It started well enough with B wanting to be Dave from Homestuck. A T-shirt with a record on the front. Some glasses. Done. Right? Wrong.
When we came back from Denmark in late September, he said, "I think I would rather be Shulk from Xenoblade". Uhm ok...?
Then he showed me the picture below on the left. Mmmmmm hmmmm.
I have a soft spot for his costume requests because I think it's a great way to get him involved in something creative and it is also his birthday on Halloween. Happy Birthday B. < --- he doesn't read my blog. (But he did approve these pictures) #lifewithateenager
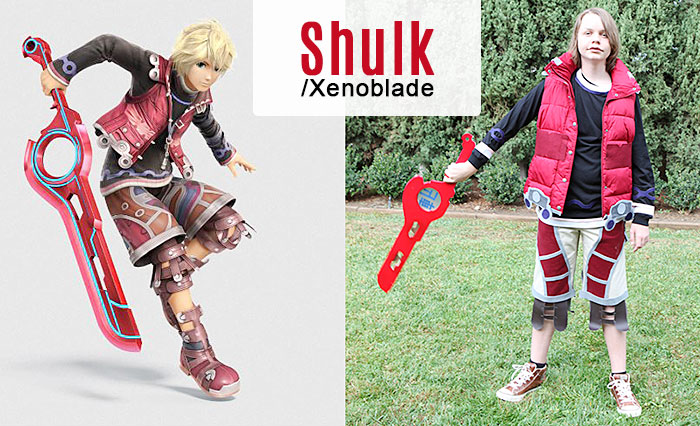
Shulk image via
I drew and thought, then drew and thought some more and got more and more overwhelmed. I would have loved to make a complete replica of that costume, but it was just so, so time consuming. For something he would wear once. Maybe twice. I am saying that after spending 100 hours on my own wedding dress. But that is totally different. Ehm.
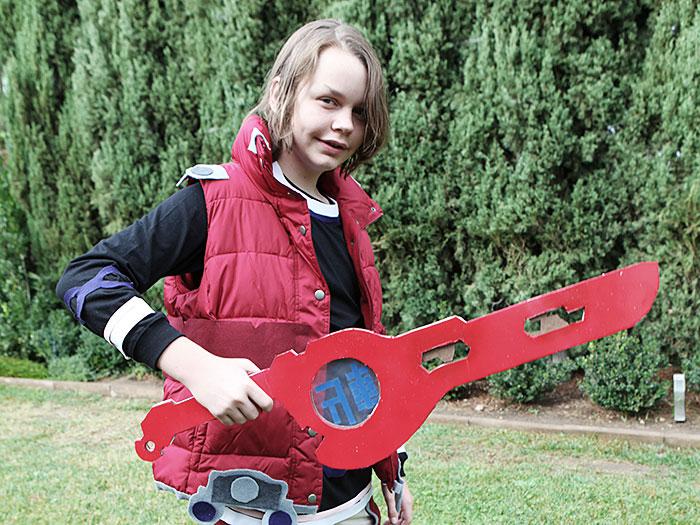
So I pared it down. Way down. I got some cheap shorts ($14), a cheap shirt ($7) and splurged on the vest ($35). I delegated the sword to B. "You make the sword, then I will make the clothes."
We went to the fabric store and bought some felt. I figured that would work with no fraying edges and lots of spray on glue to make it easy. Easier.
Here is how I made the clothes.
The shirt
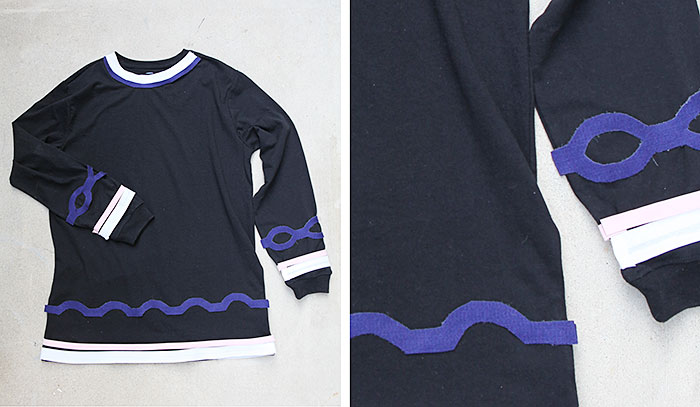
I mainly used felt, but also some bias tape - although the felt worked much better. And I used spray-on Tacky glue to attach the fabric. That was after first using fabric glue, which, I have to tell you, is not suited for a one time wear costume made by people who are in a hurry. The fabric glue needed to be ironed to stick after it was sprayed on and it just wasn't very sticky. The Tacky glue worked much better. Except on the bias tape on the bottom of the black shirt and on the sleeves. I used some hot glue there for further reinforcement.
The pants
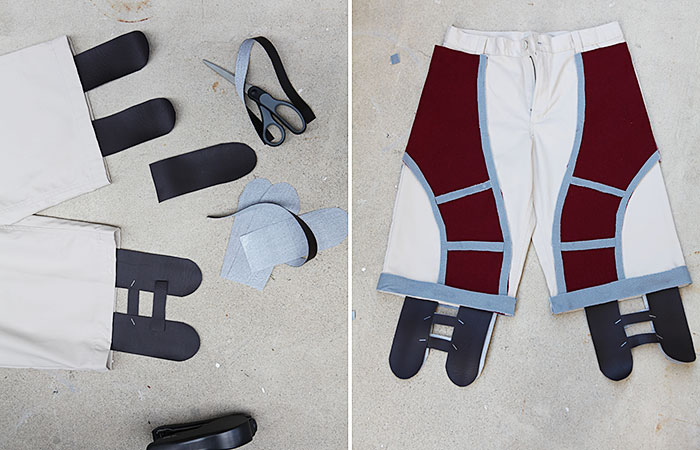
I cut some leather, or rather pleather straps to stick out from under the pants. I stapled the straps together and then stapled them to the hemline of the pants. Then I cut out felt pieces and glued them on. I first sprayed each felt piece with glue on my tarp, then brought them over and attached them to the clothes.
The vest
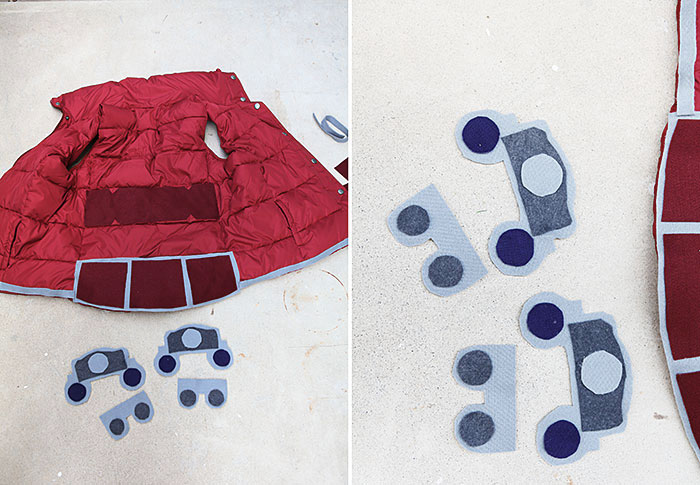
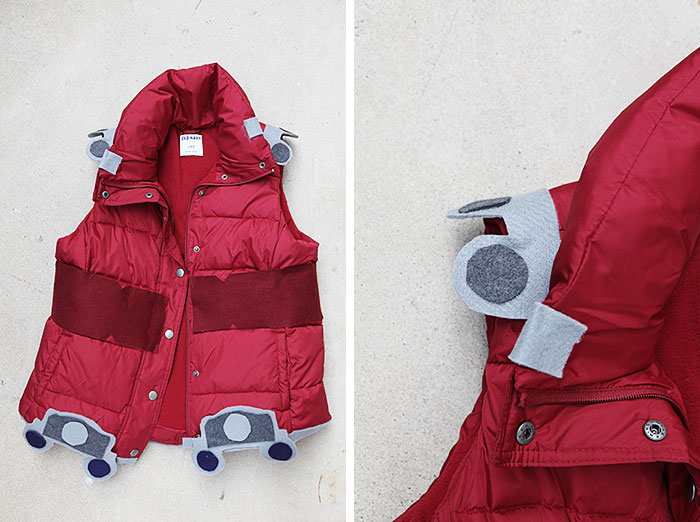
I did the same with the vest. Just going by the above picture B had showed me as well as this picture.
What took the longest was actually figuring out how to make the costume. How to pick which parts to focus on. Once I had that down, putting it together was not too difficult.
But let's talk about the sword. It's really the star of the show. And B made it!
The sword
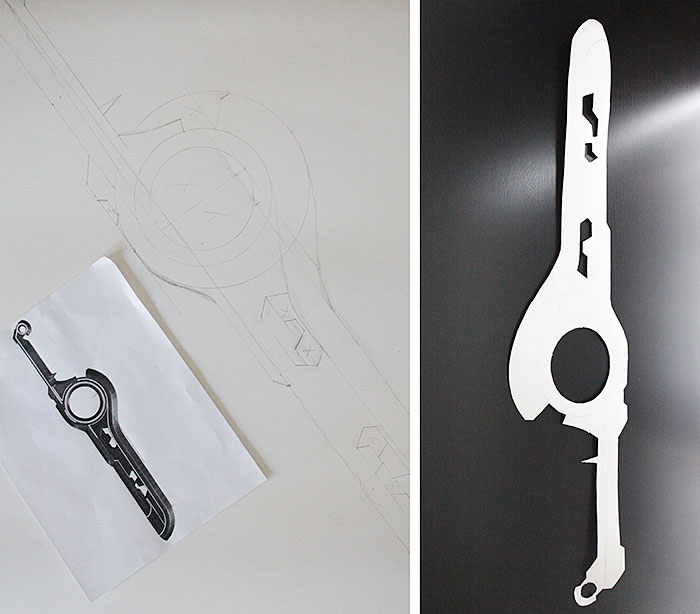
First, he printed out a black and white picture of the sword and then he hand-drew it enlarged onto a a poster board. Free hand and using round objects for the circles. Then he cut it out.
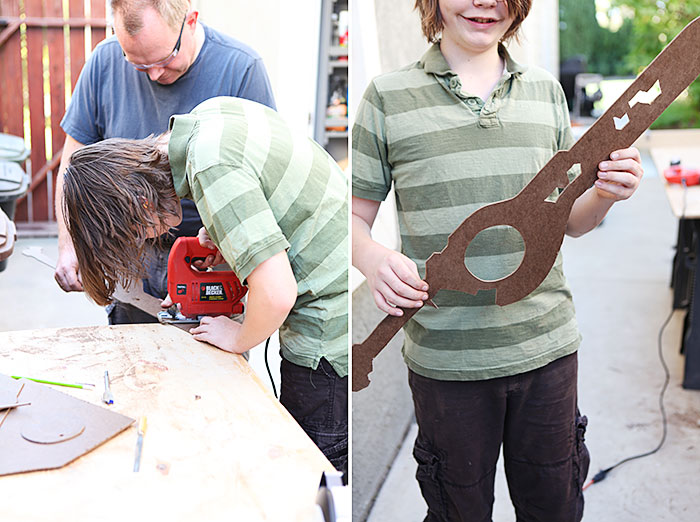
Next, he transferred the design onto a scrap piece of Masonite. We had it left over from the chevron wall in the laundry nook. He cut it out with a jig saw.
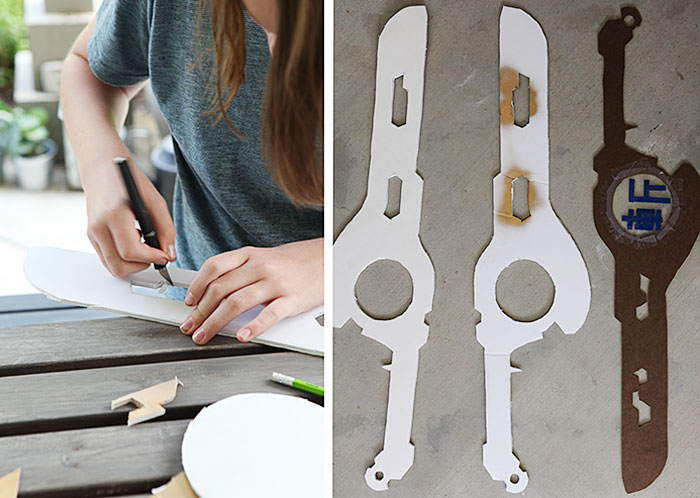
Then he cut two more of a similar shape, but with a few amendments, out of foam core board with an X-acto knife. He applied a circle of see through plastic with some blue Dymo tape embellishments to the hole of the Masonite piece.
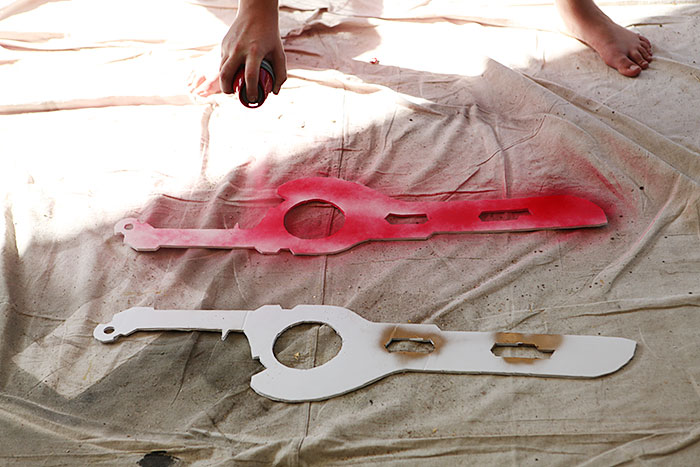
Then he spray painted the foam core bright red. He used the paint we had leftover from painting his shoes red for last years costume when he was Ness from Earthbound. He glued the three pieces together with hot glue last night.
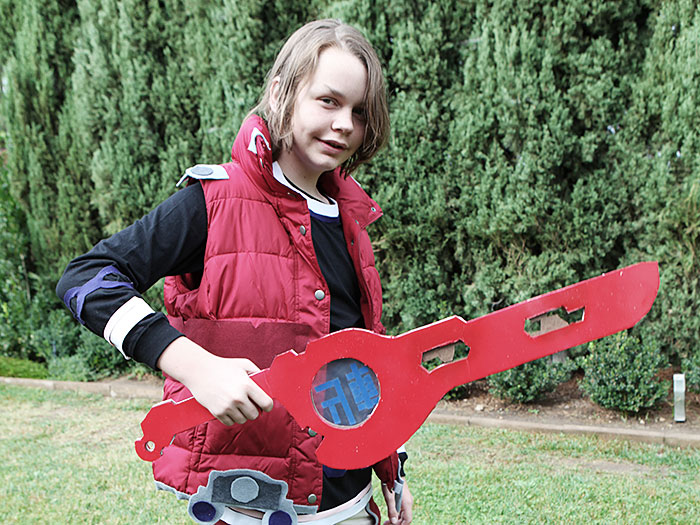
You can see that he designed it so some of the bits of Masonite would peek through the foam core board pieces in the cut-outs.
The costume was finished last night in the dark, just before dinner. Hooray.
May I present to you: Shulk from Xenoblade:
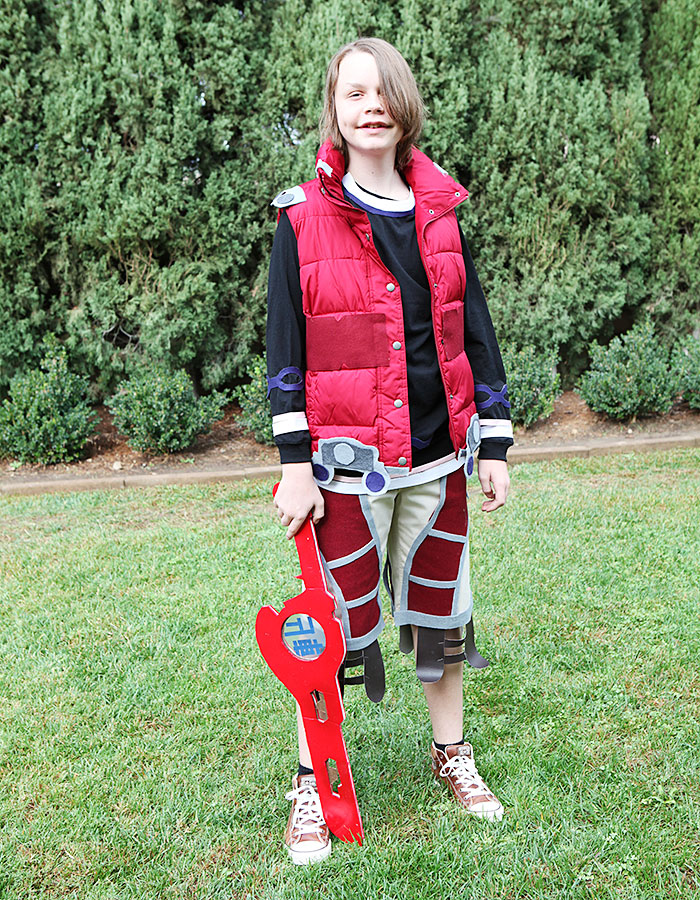
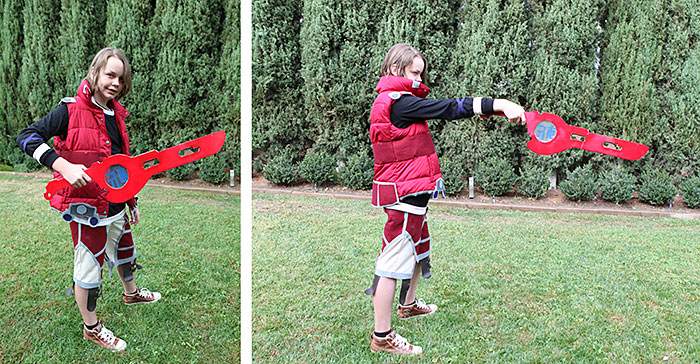
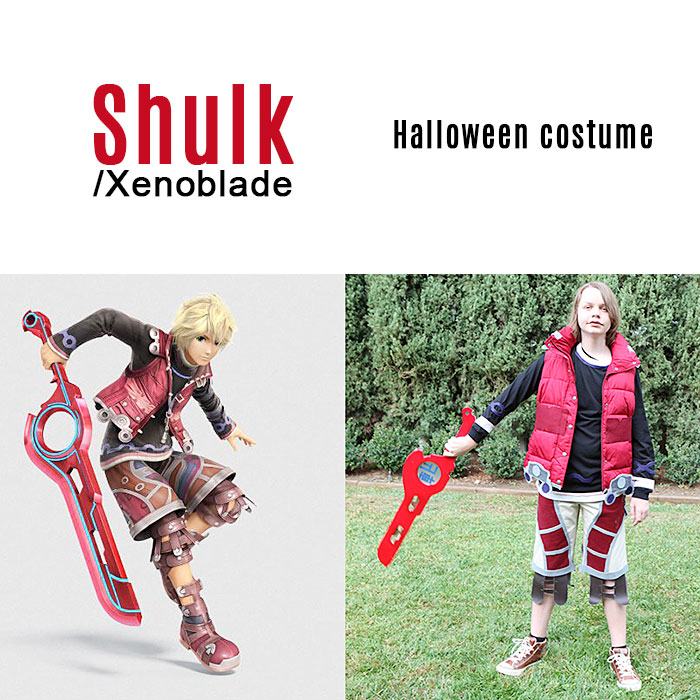
B has PROMISED that his costume next year will be more of a two hour affair. But who can say no to that face.
Share
It started well enough with B wanting to be Dave from Homestuck. A T-shirt with a record on the front. Some glasses. Done. Right? Wrong.
When we came back from Denmark in late September, he said, "I think I would rather be Shulk from Xenoblade". Uhm ok...?
Then he showed me the picture below on the left. Mmmmmm hmmmm.
I have a soft spot for his costume requests because I think it's a great way to get him involved in something creative and it is also his birthday on Halloween. Happy Birthday B. < --- he doesn't read my blog. (But he did approve these pictures) #lifewithateenager

Shulk image via
I drew and thought, then drew and thought some more and got more and more overwhelmed. I would have loved to make a complete replica of that costume, but it was just so, so time consuming. For something he would wear once. Maybe twice. I am saying that after spending 100 hours on my own wedding dress. But that is totally different. Ehm.
So I pared it down. Way down. I got some cheap shorts ($14), a cheap shirt ($7) and splurged on the vest ($35). I delegated the sword to B. "You make the sword, then I will make the clothes."
We went to the fabric store and bought some felt. I figured that would work with no fraying edges and lots of spray on glue to make it easy. Easier.
Here is how I made the clothes.
The shirt

I mainly used felt, but also some bias tape - although the felt worked much better. And I used spray-on Tacky glue to attach the fabric. That was after first using fabric glue, which, I have to tell you, is not suited for a one time wear costume made by people who are in a hurry. The fabric glue needed to be ironed to stick after it was sprayed on and it just wasn't very sticky. The Tacky glue worked much better. Except on the bias tape on the bottom of the black shirt and on the sleeves. I used some hot glue there for further reinforcement.
The pants

I cut some leather, or rather pleather straps to stick out from under the pants. I stapled the straps together and then stapled them to the hemline of the pants. Then I cut out felt pieces and glued them on. I first sprayed each felt piece with glue on my tarp, then brought them over and attached them to the clothes.
The vest


I did the same with the vest. Just going by the above picture B had showed me as well as this picture.
What took the longest was actually figuring out how to make the costume. How to pick which parts to focus on. Once I had that down, putting it together was not too difficult.
But let's talk about the sword. It's really the star of the show. And B made it!
The sword

First, he printed out a black and white picture of the sword and then he hand-drew it enlarged onto a a poster board. Free hand and using round objects for the circles. Then he cut it out.

Next, he transferred the design onto a scrap piece of Masonite. We had it left over from the chevron wall in the laundry nook. He cut it out with a jig saw.

Then he cut two more of a similar shape, but with a few amendments, out of foam core board with an X-acto knife. He applied a circle of see through plastic with some blue Dymo tape embellishments to the hole of the Masonite piece.

Then he spray painted the foam core bright red. He used the paint we had leftover from painting his shoes red for last years costume when he was Ness from Earthbound. He glued the three pieces together with hot glue last night.

You can see that he designed it so some of the bits of Masonite would peek through the foam core board pieces in the cut-outs.
The costume was finished last night in the dark, just before dinner. Hooray.
May I present to you: Shulk from Xenoblade:


B has PROMISED that his costume next year will be more of a two hour affair. But who can say no to that face.

About Katja Kromann
I am a Danish American decorating life in Seattle. I love all things design and DIY.
I can’t think of anything more fun than coming up with project, making it, photographing it and sharing it with you on my websites.
Since 2018 I have been making Ceramics, nearly full time.
AHomeForCeramics.com AHomeForDesign.com AHomeForCrafts.com AHomeForFood.com My Portfolio
Categories
Halloween no-sew costume: Shulk from Xenoblade is posted in the category Home Schooling | Seasons

