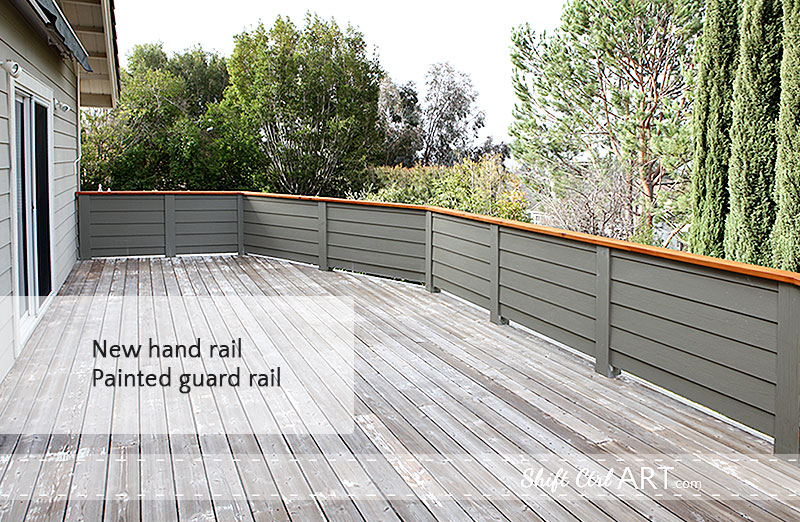
Progress on the deck off the master - hand rail installed
First a couple of things. There was a party going on here yesterday - still is. So many people stopped by after I got my first two projects accepted the day before over at CraftGawker (Thank you so much!!) - my Felt flower napkin ring and my Pixel wall art - Mario gets SUPER sized.
I checked hats at the door and served cold drinks.

Then yesterday Makezine.com/blog featured pixel Mario via CraftGawker. I was jumping up and down when I saw that one. That's a first for me!!
Then, a pinner, who I am now following - Luiza - pinned Mario. She has over 3 million followers (wow!) and Excellent taste No really - also in other things than Mario. Within hours it had over 200 repins.
---
Ok, now back to the post... Today I want to share our progress on the deck off the master.
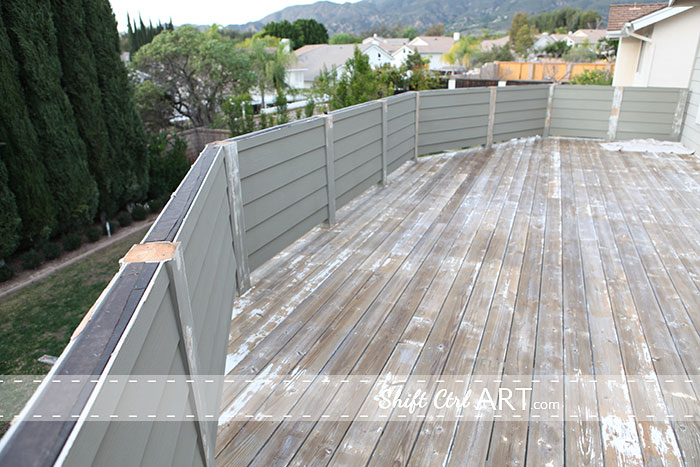
Remember back in January when we started this project? We had all the loose paint removed by a very thorough power washing.
But let me back up first, as I just unearthed some photos of what the deck looked like about 6 months after we moved in.
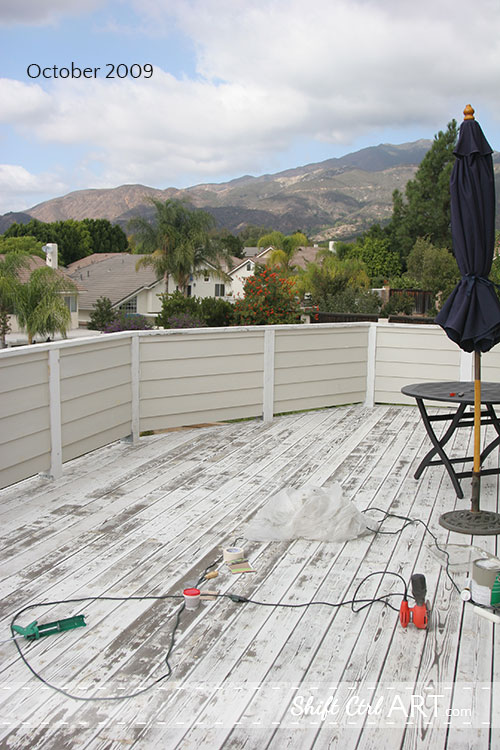
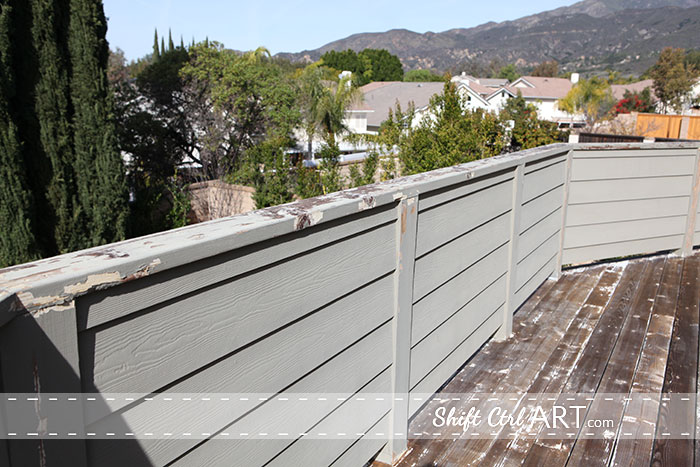
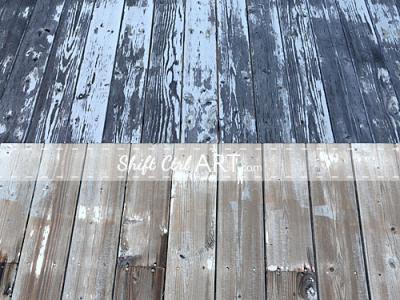
As you can see the deck boards had already begun peeling after the previous owners had given everything a "once over" with a thin thin sprayed-on primer. The guard rail had primed posts and hand rail, and the siding was painted the color of the house.
I painted it that dark gray that you see now, but even though I sanded and primed before I painted, it did not look good for very long. Especially not the hand rail.
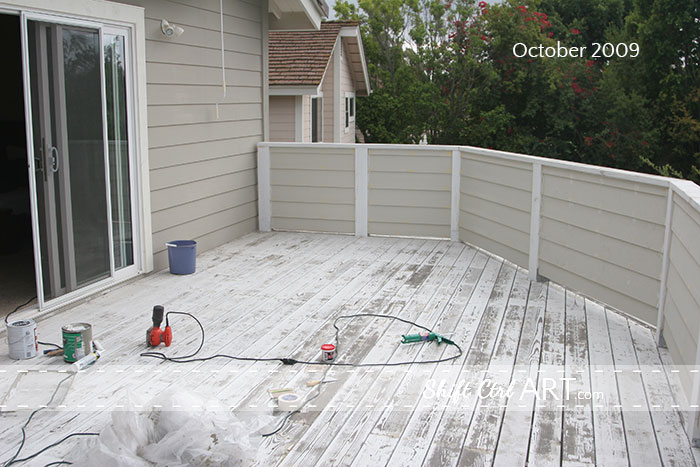
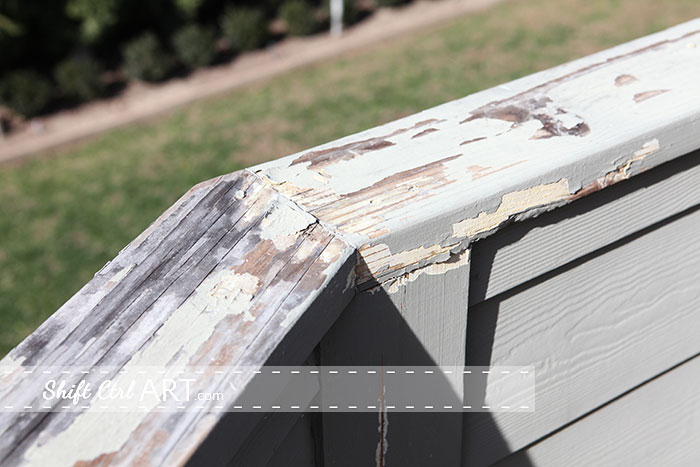
Here you see what it looks like from our master which leads out onto the deck, before the power washing.
And here you see how much loose paint came off after the power washing.
The hand rail, especially, was not looking too good, so we decided to switch it out. This one was made out of regular fir. We wanted to upgrade that to cedar.
Here the hand rail has been removed.
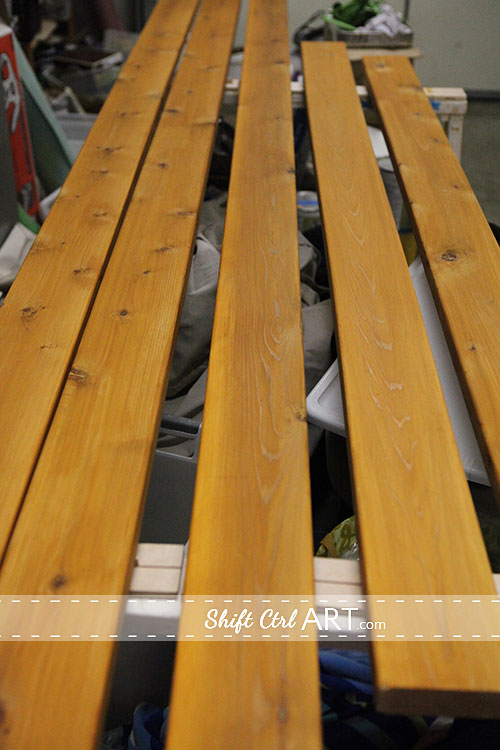
And here is the newly stained cedar wood waiting to be installed.
Then we hit a little snafu. I am mentioning it, not because it is terribly important, but just so that you know that part of remodeling is that everything does not always go smoothly the first time. If you factor that in from the beginning you will have a much more pleasant experience and being able to roll with the punches.
When our guy (remember, this was our one big project that we contracted out) went to put on the railing, it did not have the proper overhang. It was too narrow. This was because you could not get the cedar already smooth, so after planing the rough cedar it got too small. What to do... We went and got new wood - this time 2x8 instead of 2x6 and that fit much better. So look for 2x6 cedar in some upcoming project - is all I'm saying
Here the 2x8 hand rail is being installed.
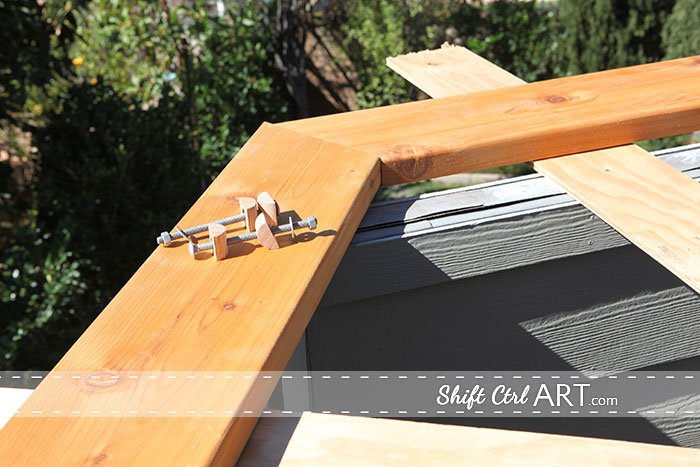
The corners were being tightened together underneath with those bolts, in some routed out holes on the back of the boards.
I have to say, he did an EXTREMELY good job with the seams. Those suckers are tight. I don't think we could have done nearly as good a job ourselves. I am so happy with how it looks.
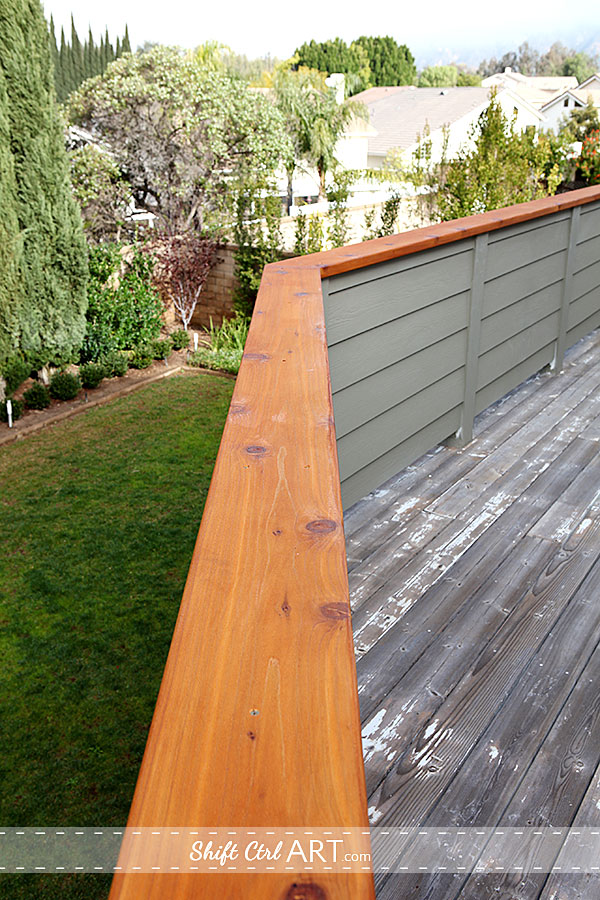
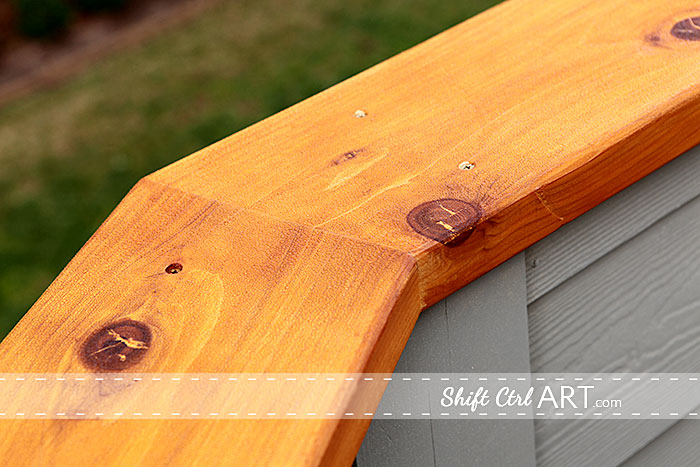
The cedar is stained with Cabot Timber Oil stain - wood finish - Honey Teak color. I think it's my new favorite wood staining color.
Ok... hear me now telling you how much I love the yellow hue in this color after telling you how much I didn't like yellow in the kitchen or in all the other rooms. I love the yellow hue of this stain. Bam.
After it was installed - already stained - it got another coat which sealed the screws as well.
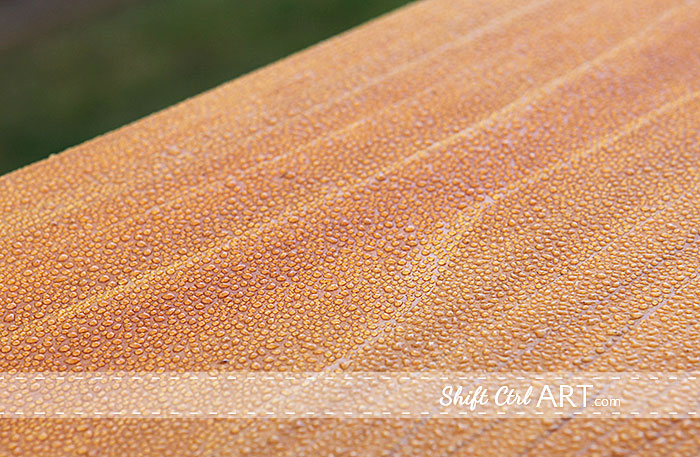
Check out how well it is repelling the morning dew in this picture.
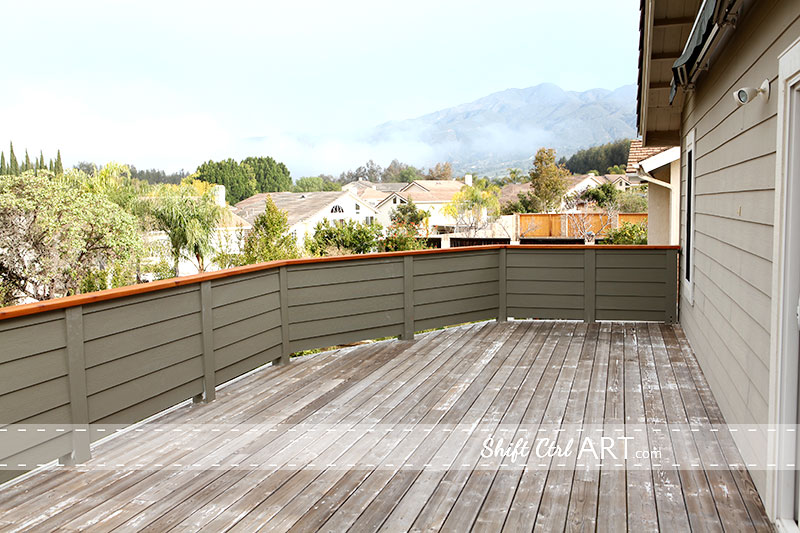
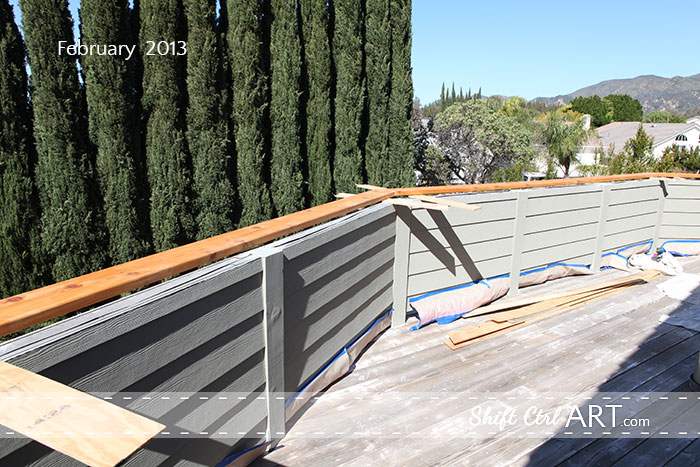
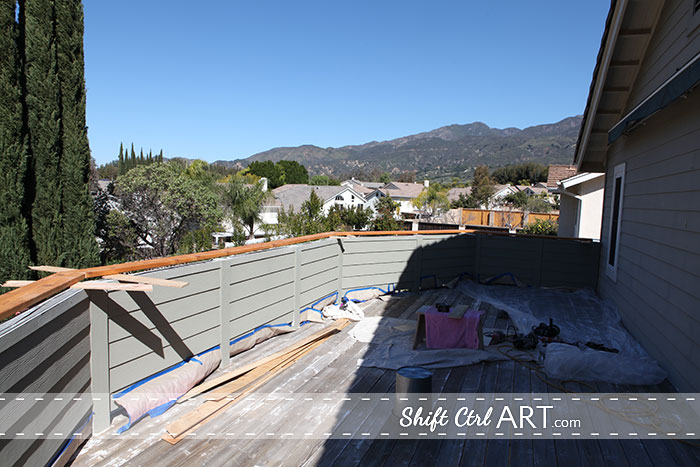
And here is the finished hand rail and guard rail.
Let's talk about where we are with this project.
I have added a few more items on the to do list as we uncovered a few problems downstairs with the patio. More on that later.
Here is where we are so far.
1.Power wash the deck and patio Read about it here
2.Plane and cut new Cedar wood hand rail for the top of the guard rail on the deck.
3.Stain the new Cedar wood hand rail and install it.
4.Paint guard rail and columns.
5. Extend walk way by patio *new*
6. Move sprinklers away from patio *new*
7. Make a rock/boxwood bed around patio *new*
8. Replace the trim around the feet of columns.
9. Add flashing to the deck.
10. Add exterior plywood to the top of deck.
11. Cover plywood with rubber membrane.
12. Hang lights on ceiling of patio.
13. Decorate.
Isn't it already looking a 1000 times better? Now I am kind of wishing we had some lounge chairs for up here as well We are going to make the deck solid by putting plywood over top with flashing and then add a rubber/concrete membrane over top. That way we can use the patio down stairs even when it rains and not worry so much about taking the chair cushions inside when it rains.
What about you? Are you thinking about getting your outdoor space ready for summer yet or is that not even on your radar yet? Is it still snowing where you live? I can't wait to begin being outside more when this is done.
Psst, I posted some cute baby photos on Facebook yesterday. Follow me over there for extra content.
Next: Deck off the master - repaired, planed, painted.
Share
I checked hats at the door and served cold drinks.
Then yesterday Makezine.com/blog featured pixel Mario via CraftGawker. I was jumping up and down when I saw that one. That's a first for me!!
Then, a pinner, who I am now following - Luiza - pinned Mario. She has over 3 million followers (wow!) and
Excellent taste No really - also in other things than Mario. Within hours it had over 200 repins.---
Ok, now back to the post... Today I want to share our progress on the deck off the master.
Remember back in January when we started this project? We had all the loose paint removed by a very thorough power washing.
But let me back up first, as I just unearthed some photos of what the deck looked like about 6 months after we moved in.
As you can see the deck boards had already begun peeling after the previous owners had given everything a "once over" with a thin thin sprayed-on primer. The guard rail had primed posts and hand rail, and the siding was painted the color of the house.
I painted it that dark gray that you see now, but even though I sanded and primed before I painted, it did not look good for very long. Especially not the hand rail.
Here you see what it looks like from our master which leads out onto the deck, before the power washing.
And here you see how much loose paint came off after the power washing.
The hand rail, especially, was not looking too good, so we decided to switch it out. This one was made out of regular fir. We wanted to upgrade that to cedar.
Here the hand rail has been removed.
And here is the newly stained cedar wood waiting to be installed.
Then we hit a little snafu. I am mentioning it, not because it is terribly important, but just so that you know that part of remodeling is that everything does not always go smoothly the first time. If you factor that in from the beginning you will have a much more pleasant experience and being able to roll with the punches.
When our guy (remember, this was our one big project that we contracted out) went to put on the railing, it did not have the proper overhang. It was too narrow. This was because you could not get the cedar already smooth, so after planing the rough cedar it got too small. What to do... We went and got new wood - this time 2x8 instead of 2x6 and that fit much better. So look for 2x6 cedar in some upcoming project - is all I'm saying
Here the 2x8 hand rail is being installed.
The corners were being tightened together underneath with those bolts, in some routed out holes on the back of the boards.
I have to say, he did an EXTREMELY good job with the seams. Those suckers are tight. I don't think we could have done nearly as good a job ourselves. I am so happy with how it looks.
The cedar is stained with Cabot Timber Oil stain - wood finish - Honey Teak color. I think it's my new favorite wood staining color.
Ok... hear me now telling you how much I love the yellow hue in this color after telling you how much I didn't like yellow in the kitchen or in all the other rooms. I love the yellow hue of this stain. Bam.
After it was installed - already stained - it got another coat which sealed the screws as well.
Check out how well it is repelling the morning dew in this picture.
And here is the finished hand rail and guard rail.
Let's talk about where we are with this project.
I have added a few more items on the to do list as we uncovered a few problems downstairs with the patio. More on that later.
Here is where we are so far.
1.
2.
3.
4.
5. Extend walk way by patio *new*
6. Move sprinklers away from patio *new*
7. Make a rock/boxwood bed around patio *new*
8. Replace the trim around the feet of columns.
9. Add flashing to the deck.
10. Add exterior plywood to the top of deck.
11. Cover plywood with rubber membrane.
12. Hang lights on ceiling of patio.
13. Decorate.
Isn't it already looking a 1000 times better? Now I am kind of wishing we had some lounge chairs for up here as well
We are going to make the deck solid by putting plywood over top with flashing and then add a rubber/concrete membrane over top. That way we can use the patio down stairs even when it rains and not worry so much about taking the chair cushions inside when it rains.What about you? Are you thinking about getting your outdoor space ready for summer yet or is that not even on your radar yet? Is it still snowing where you live? I can't wait to begin being outside more when this is done.
Psst, I posted some cute baby photos on Facebook yesterday. Follow me over there for extra content.
Next: Deck off the master - repaired, planed, painted.

About Katja Kromann
I am a Danish American decorating life in Seattle. I love all things design and DIY.
I can’t think of anything more fun than coming up with project, making it, photographing it and sharing it with you on my websites.
Since 2018 I have been making Ceramics, nearly full time.
AHomeForCeramics.com AHomeForDesign.com AHomeForCrafts.com AHomeForFood.com My Portfolio

Categories
Progress on the deck off the master - hand rail installed is posted in the category Master Suite | Outdoor Living


